You can easily translate the web content to your language with the Google Chrome.
Do szybkiego tlumaczenia na Twoj jezyk, polecam uzywanie przegladarki Google Chrome.

Thursday, February 28, 2013

Straws Therapy

 
The easiest way to improve overall oral-motor function for speech purposes is simply to exercise the muscles while eating.  A very useful tool would be a straw. The use of straw in speech therapy is commonly known. For years straws have been an important utensil in feeding and lip rounding exercises. In the clients' opinion  the straws are fun and the food is a reward. The primary goal of straw is to concentrate on insufficient tongue retraction. These exercises encourage increased speech clarity whether the person has an inter-dental lisp or other varieties of phoneme distortions. Therapeutic straws have also been found to be useful when working with velo-pharyngeal insufficiency or patients that are recovering from a cerebral vascular accident (CVA). In these instances and numerous others, specially gradated straws are used in a hierarchical succession to work on a specific component of oral movement.
Internationally well known an American Speech Language Pathologist - Sara Rosenfeld-Johnson, M.S.,CCC/SLP has created a line of straws along with the related step-by-step exercises. She said that when she was initially using straws for feeding or lip-rounding goals, she was struck by the improved tongue retraction and as the result speech clarity. Since then straws have become one of my most important therapy tools for her. Further she says: “Traditional therapy methods start with the assumption of adequate tongue muscle function. The premise of traditional therapy would follow that if you listen to me when I say "ball" (auditory stimuli), and you look at a ball when I say it (visual stimuli), and if you hold the ball (tactile stimuli) when I say it, then through this multi-sensory approach you will acquire the ability to say "ball". Oral motor therapy (OMT) does not work like that, particularly with our special education clients who have reduced visual or auditory capabilities. OMT asserts that the translation of this tactile information has to take place in the mouth; that therapists must put something into their client's mouths that is going to increase their client's awareness of their mouth and that will, in a series of measured progressions, strengthen the target muscle groups. This oral muscular development and control is an important prerequisite which then enables the clinician to use traditional articulation therapy. At the therapeutic level straws have the promise of addressing a multiple array of disorders and muscle groups far beyond traditional practice. Let's review some basics. In English, in order to have connected speech (co-articulation) and speech clarity we have to stabilize the back of our tongue on the back of the palate. Then, whatever else our tongue is required to do, it moves from that position of stability. The tongue elements work with four basic movement components:
  • retraction/protrusion
  • back elevation/depression
  • tip elevation/depression and
  • the ability to spread the sides of the tongue.
When babies are born they have approximately a 50% back and 50% forward movement from the resting position called a suckle. As the child gets older and begins spoon and cup-feeding they achieve about a 75% retraction and 25% protrusion. They do not stick their tongues out during feeding. Those who do frequently present with feeding problems. Straws have been prescribed routinely for these occurrences because, at the very least, through straw feeding, the client can return to the 50%/50% suckle. But there is no reason to stop there, and, I would argue that allowing clients to suckle straws is therapeutically wrong IF treatment stops there. Suckling can actually exacerbate protrusion of the tongue. (It should be mentioned that sippy-cups, a popular feeding tool, encourage suckling, once again falling short of the preferred 75%/25% retraction/protrusion goal.)
By continuing to use a progressive series of increasingly more complex straws and thicker liquids we can teach the tongue muscle to retract. The goal is to achieve close to a 75% retraction; to achieve that position of stability. The back of the tongue in stabilized retraction allows the tip of the tongue to move side-to-side to alternating back molars; the very movement that is needed to chew food effectively. At this milestone we have clients who attain more eating independence and improved nutrition, both very important for children that have not progressed well with cups or spoons.
How do therapeutic straws address speech clarity goals? Children or adults with interdental lisps are missing this important component of stabilized tongue retraction. Clients who stabilize their tongue at the front of their mouth between their teeth, rather than in the retracted position of stability, are said to be fronting their sounds. If a client is using an interdental production on /t/, /d/ or /n/, which are the first stable retracted sounds in the developmental scale, the mastery of these sounds must occur before attempting to master /s/ or /z/. If a developmentally normal three-year-old interdentalizes on /n/ there is already a problem. In fact, any three-year-old with an interdental production on /t/, /d/ or /n/ needs help to retract the tongue, and further, any child with an identified speech problem who suckles, whether its a bottle, cup or straw, is maintaining their speech errors if they are secondary to interdental tongue placement. (If a developmentally normal four-year-old does not interdentalize on /t/, /d/ or /n/, has correct tongue blade retraction, but lisps on /s/ it is possible that the lisp is secondary to a developmental delay and may not need therapeutic intervention.)
How do we get clients on therapeutic straws and at what age or point in therapy? Muscles can be toned at any age; one or one hundred. These techniques will work anytime but the younger the client the easier.
Young children with an identified dysfunction can often be started as early as one-year-old. Many of our clients with Down Syndrome are started this early because we are working on the concept of retraction as a critical oral motor skill that then cascades into other oral motor benefits. Other clients with a low tone diagnosis also benefit from this early intervention. Many of these children are still on a bottle at ages two, three or four; suckling. In virtually all cases, by the age of two, straw therapy can be successfully 
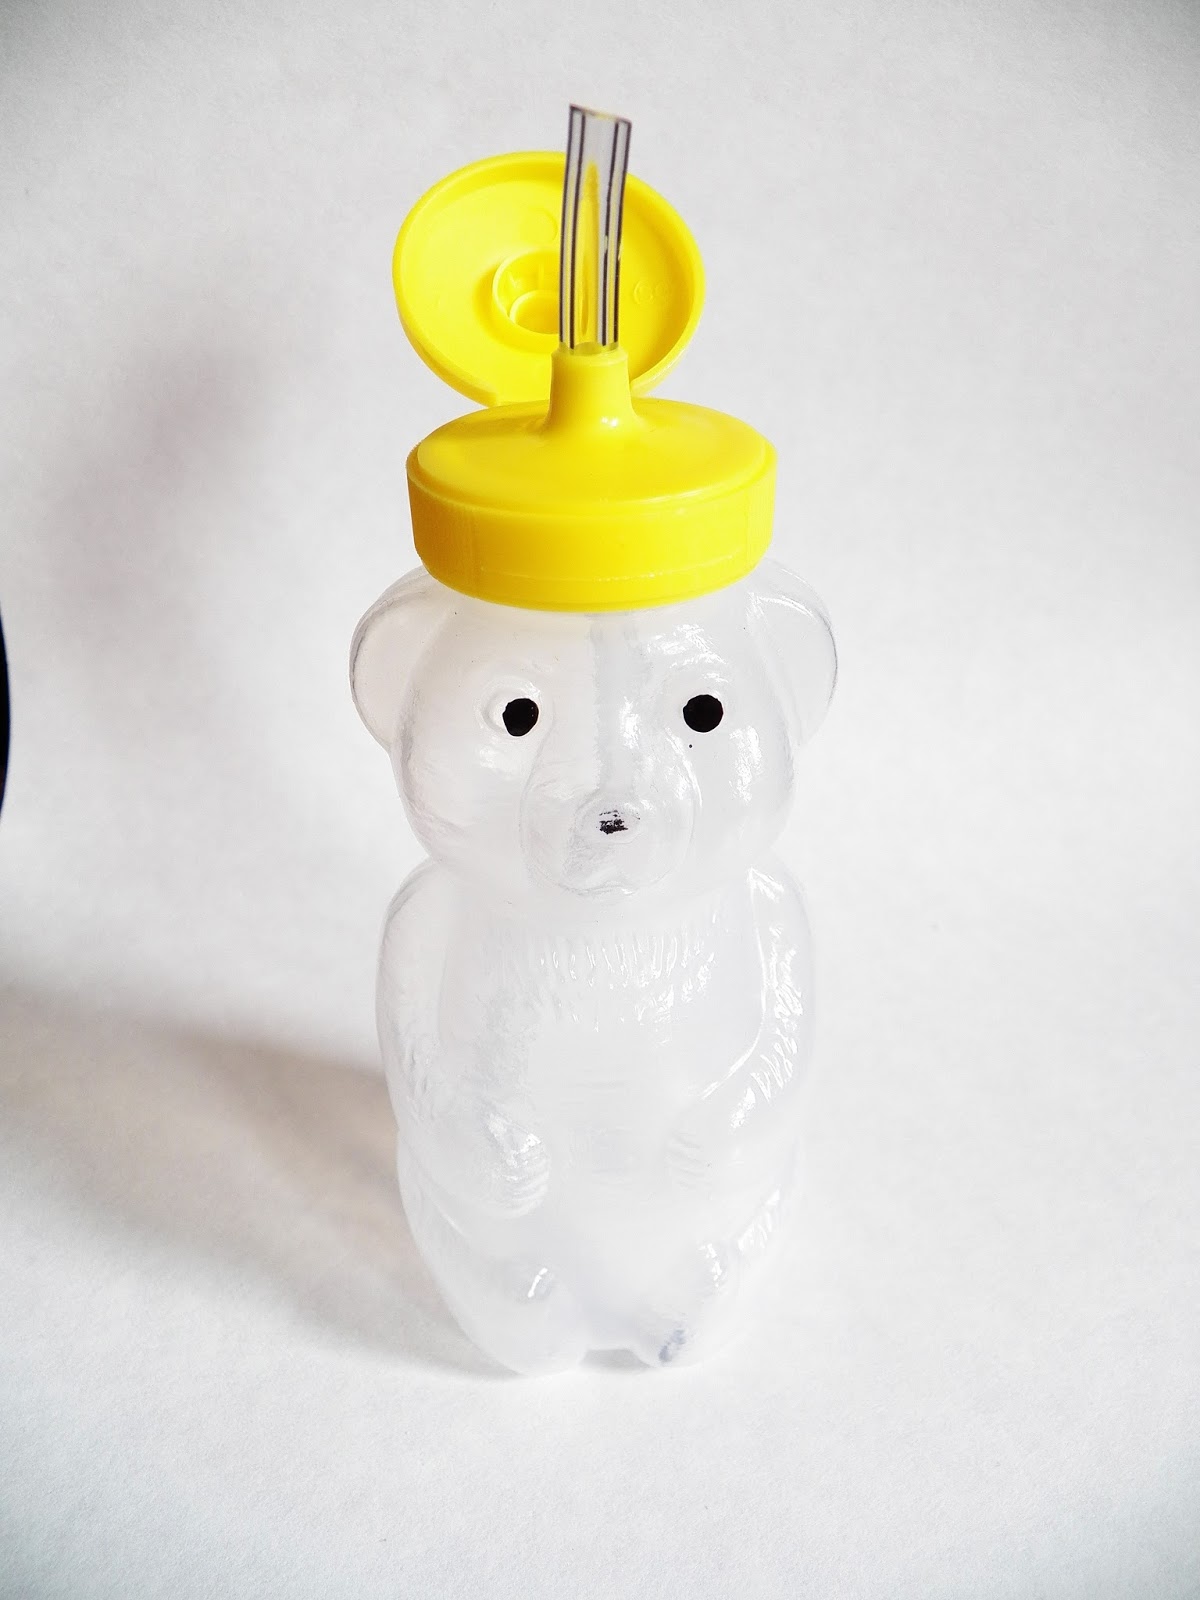
undertaken. Some children need an assisted transition. I use a squeezable "honey bear", emptied, cleaned, filled with slightly thickened liquid and retrofitted with a straw. The child can still clutch the "honey bear" bottle while learning to draw liquid up through the straw. The care-givers for low-tone children who may not be able to pull liquids up on their own initially can gently squeeze the liquid up to assist.
Exactly what is straw drinking? Normal straw drinking requires complex movement from the jaw, lips and tongue. Through the coordination of these movements a vacuum draw is created. Each of our speech sounds are made with a different combination of these graded movements.
Over many years I developed a successional group of straws with each individual straw working on a specific part of those graded movements. After initial experiments with ordinary straws, which offer such limited results as to be therapeutically unusable, I located every conceivable type of straw produced and jury-rigged them when necessary. Ultimately I was compelled to persuade straw manufacturers to custom-produce a few of the straws for the specific attributes that I needed.
This hierarchy of straws progresses through a matrix that advances from multiple sips to single sips and then from thin liquids to thickened liquids while varying the straw's diameter, overall length and the structural complexity via elbows, curves, twists and placement of a lip block.
How would therapy begin? At the outset - making sure that the client is sitting up straight in a stable position receptive to drinking - I give them a simple, straight, regular-diameter straw to see how they will use it, allowing them to drink from it like they normally would. I place my finger at the point where the straw is entering the mouth so that I can then take the straw out and measure the length from the entry point to the tip of the straw that is inside the mouth. There are several things to watch for at this stage. Is the straw more than 1/4 - 1/2 of an inch inside their mouth? If so, then they are either suckling it or biting it. Is the client biting the straw? If so, that could be an indication of jaw instability. The correct position for the therapeutic use of the straw is with jaw stability, tongue retraction and lip rounding to fully enable drawing.
The first straw in my hierarchy is cut to the length that I measured above. The straw has a lip block which encourages sealing and rounding. Over a succession of visits as the client exhibits proficiency I surreptitiously reduce the length from the lip block to the internal tip until the client has achieved primary retraction and at least minimal lip rounding. At this point the client is said to be therapeutically drinking from a straw and I am free to move through the remainder of my hierarchy. Clients are taking these straws home and using them daily for drinking all thin liquids. As they progress, thickened liquids and purees are introduced using specifically identified straws in the hierarchy. The clients use these straws to drink 3-4 ounces once a day. As each straw is mastered or seems to be too easy, I move onto the next. For some clients this may be as frequently as one new a straw a week, as it might be in the case of a developmentally normal child with an interdental lisp. For this client a full, successful course of treatment may last as short as four months.
Other clients, depending on the diagnosis, for example cerebral palsy, the therapy, while still effective, may continue for a longer period of time. A client with Down Syndrome may complete the full treatment in one to two years and we often find that this t ype of therapy reduces the duration of speech therapy as they get older. Clinicians who are targeting specific sounds in therapies with their clients will find that therapeutic straw treatments have proven to be effective with the standard production of /t, d, l, n, k, g, s, z, ch, sh, j, & r/.
Clients with velo-pharyngeal insufficiency are another population that benefit from straw drinking. For them it increases tongue retraction, changes resonation and elevation of the velum. Clients recovering from Cerebral Vascular Accidents (CVA) often exhibit lip asymmetry. Therapeutic straw drinking works to bring their lips to symmetrical midline thereby improving speech clarity.
An extra advantage of treatment through therapeutic straw drinking is that it can be equally effective with clients irrespective of cognitive abilities. That is the therapeutic results, (tongue retraction and tongue grading), for a client with severe cognitive impairment and limited or no language skills can be almost the same as with a developmentally normal child or adult. This adds to its promise as an important tool in the arsenal of all oral motor and speech pathologists.” http://speech-language-pathology-audiology.advanceweb.com/Article/Part-I-Straws-Using-Simple-Tools-in-Oral-Motor-Therapy.aspx
I personally attended the courses presented by the master, Sara Rosenfeld-Johnson and truly recommend to have a look, get familiar or buy a set for yourself to try http://www.talktools.com/straw-kit/

Benefits of Playdate

Children learn through playing with other children, so it is important that they get plenty of opportunities to do so. A play date is a great way to help children to grow socially, intellectually and physically.  They learn how to interact, cooperate and collaborate to plan together, to agree on things, and what to do when they disagree. They gain the knowledge how to share, take turns, be polite and respectful. Kids learn to think about what another child wants or needs. These help them to learn about empathy, the foundation of tolerance. The empathy, which is the antidote for bullying. Children get also a chance to learn new games, in different setting, with the toys that they don’t have at home. And of course while doing some projects they master fine motor skills or burn off their energy while mastering a monkey bar. There is something unusual about a play date, unstructured, unfettered, unencumbered play. It gives kids the opportunity to imagine, pretend, play silly and be proud of their own abilities.
A structure of a play date is really up to a hosting parent, who decides what and where the children will play (a playground, garden, park, museum, or home), whether they will play on their own just under some supervision or if an activity/project is going to be set and offered. The main thing is that the children get to play together. From my experience some careful planning can make play dates more likely to be successful and enjoyable for all participants. This includes keeping a play date short (90 minutes up to two hours), providing a healthy snack, so the kids can watch and learn manners and try new food they wouldn’t even touch at home, choosing kids that genuinely like each other, sticking to a small group up to four, and putting aside toys that might cause sharing problems. Even young children can benefit from play dates. Infants and toddlers might play side by side, commonly known as a parallel play. This is an important stage in peer relationships. As they get older, they will start to play more together and practice such things as sharing and speaking their minds instead of hitting.
 
You wonder how parents will benefit from a play date?  They can meet other families with whom they can become friends, brainstorm some ideas or watch own child how does he make a new friend and act in a group.
 
When you arrange a play date don't overplan - stay simple.  For example, when a playdate is happening at home get out clothes for a dress up, an old bed sheet to play a parachute, some puppets, let them set up a store with things to sell and play money; give them some space, some papers, crayons, glue and let them be creative. Make sure to ask the kids what they'd like to do. Make them feel a part of the planning. Be prepared to introduce something new, especially if an activity doesn't appeal to one of the kids. Get some print outs in advance as a back up plan. For worksheets’ and printable go to http://www.education.com/worksheets/
Soon after the playmates arrive, talk about what the rules are in your home. Tell what is OK and what is not., e.g. if they are they allowed to take what they want out of the kitchin, play with the water, turn on the computer, etc. Make sure your child takes some responsibility for his friend. Don't allow any physical fighting - that would be when you might want to separate the kids for a short time. If these are very young kids, 3 and under, you should be in the same room. If they are older, 5 to 10, it's still a good idea to stay within earshot. Plan your schedule so you're fully available. You may be called upon to be referee, or at the very least, activity director. For the activities go to http://www.education.com/activity/
 
 “…Here are just a few of the proven scientific benefits of letting our kids get messy and doing something besides clicking those darn keypads and video controllers and paper and pencil tasks:

1. Play boosts children’s creativity and imagination. Play gives children the chance to invent, build, expand, explore and develop a whole different part of the brain.
2. Play stretches our children’s attention span. Playing outdoors just 30 minutes a day increases child’s ability to focus and pay attention.
3. Play and rough-housing boost boys’ problem solving abilities. The more elementary school-boys engaged in rough-housing, the better they scored on a test of social problem solving. (Don’t ya love that one!)
4. Play boosts self-confidence and self-regulation. Kids learn to become masters of their own destiny without an adult directing, pushing, managing or scheduling.
5. Play forges friendships, strengthens social competence and teaches social skills. Undirected play allows kids to learn how to work in groups, share, negotiate, communicate and develop core social skills they need not only now but for the rest of their lives.
6. Play helps kids learn to enjoy just being in their own company, entertain themselves and develop identity. Ease that guilt when your kid says, “I’m bored, Mom!”
7. Play reduces children’s anxiety and diminishes stress. A study published in the Journal of Child Psychology and Psychiatry shows that play is also critical for our children’s emotional health because it helps kids work through anxiety and reduce stress.
8. Play creates joyful memories of childhood. Come on, no kid is going to remember the car pools and worksheets but the swings, jumping in leaves, playing leapfrog in the mud, blowing bubbles, building forts–those are the unforgettable childhood moments. Sigh!
9. Play boosts physical health and reduces risk of obesity. Henry Joseph Legere, MD, author of Raising Healthy Eaters points out: “Rises in screen time have led to the rise of a sedentary lifestyle for our children. In 1982, the childhood obesity prevalence in the United States was actually less than 4 percent. By 2004, that number had grown to about 30 percent.”
9. Play expands our kids minds and neurological development. Self-initiated play improve skills such as guessing, figuring, interpreting and is important to brain development and learning
10. Play builds new competencies, leadership skills, teaches lifelong hobbies, and develops resilience. “Play is what allows kids to manipulate their environment,” says a report written by Kenneth Ginsburg, M.D. of the AAP, “And how you manipulate your environment is about how you begin to take control, how you begin to develop your senses, how you view the world.”
11. Play nurtures the parent-child bond. Child-driven play also improves our parent-kid relationship. Play offers a wonderful opportunity for parents to see the world from our children’s eyes as well as strengthen our relationship when we join in." To read more go to

Thursday, February 14, 2013

Fever – High Temperature Remedies

 
Basia, 2007
Higher temperature is not always a bed sign.  At first, because it is a symptom of defense reaction of the body, the immune system mobilizes signal to combat microbes. Moderate fever accelerates metabolism, which stimulates the formation of immune antibodies, besides higher temperature damages the virus. However, prolonged high fever increases the body's need for oxygen, water and energy, leading to dehydration and exhaustion, inhibits immune responses. In general moderate fever (up to 38°C degrees Celsius or 100.4°F degrees Fahrenheit) can be left without medication. At temperatures above 38.5°C or 101.3°F antipyretics are recommended.

What is considered fever?
  • Normal child’s temperature is 36.6 – 37.5°C (degrees Celsius) or 98– 99.5°F (degrees Fahrenheit). This is due to the immaturity of thermoregulatory activity of hormones and variable during the whole day - usually in the morning the temperature is lower by about half a degree than in the evening.
  • Feverishness - 37.6 - 38°C or 99.7 – 100.4°F
  • Mild fever - 38.1 - 39°C or 100.6 - 102.2°F
  • High fever - above 39°C or 102.2°F
How to measure temperature?
The temperature can be measured in several ways: in the rectum, forehead, ear or mouth. 
  • In-ear, infrared thermometers are very comfortable. You insert it into a child's ear. The result is shown in seconds and it is very accurate, because the eardrum is the same heat storage, which thermoregulatory center in the brain. 
  • Other, less stressful is a soother thermometer which you place into a child’s mouth. It looks like a normal Teether, but the silicone parts have sensors which measure the temperature. 
  • You can also use an electronic thermometer which you insert into a child’s rectum. You position a child on the side or tummy.  Lubricate the tip of the thermometer in a baby fat cream and gently slide it into the anus.  You will get a result after 30 seconds. If the child starts to kick his legs or tightens buttocks remove the thermometer - the tip of the thermometer can damage the anal area. 
  • Doctors advise not to use the forehead strips, since they can not guarantee the correct measurement.
What are homemade ways to decrease fever?
  • One home made way is a bath in cool water, 2 degrees lower than the body temperature not to cause a thermal shock.
  • Another home made way is to put on your child’s feet soaked in cold water, wool, thick socks, and then wrap the feet with a towel and cover with a blanket or quilt. After a few minutes the temperature of the body will definitely be significantly reduced - the treatment can be repeated after one hour.
  • In Addition you can always put cool compresses on the face, neck and calves changing them every quarter.
What are fever-lowering drugs, dosage and how often give it to the child?
In the pharmacy you can find lot of different types of lowering the body temperature, antipyretic drugs. They are based ether on:
Acetaminophen, an active ingredient of Tylenol or
Ibuprofen, an active ingredient of Motrin. 
Why do we need to watch for high temperature?
  • Prolonged high fever increases the body's need for oxygen, water and energy, leading to dehydration and exhaustion, inhibits immune responses. High temperature increases heart rate (increase in body temperature by 1°C increases the number of heart beats per minute to 10) and courses the lungs dry and fatigue (increased water loss occurs through rapid breathing).
  • Besides that, high temperature can cause a febrile seizure and result in brain damage.  Febrile seizures are rhythmic muscle contractions, which usually lasts a few minutes, sometimes with loss of consciousness. Febrile seizure is the nervous system reaction to the rapidly increasing temperature.   In the attack of febrile seizures call a doctor as soon as possible. While waiting, place the child on his side and loosen his clothes. Enter antipyretic drug in suppository (liquid medications are excluded, since the parson with seizure could choke on). After the seizure incident the child should receive an EEG neurological examination to rule out brain damage.
How to comfort a child?
  • Initially, when the temperature rises, your child should be well covered. However when the temperature is stable there is no need to tuck the child as this could lead to overheating. 
  • Dress the child lightly and periodically check if the child is sweating - wet clothes need to be changed immediately. 
  • A fever child has no appetite so do not force food. Nevertheless the child should be well hydrated. If you are breastfeeding, frequently bring a little one for a short time. If the child drinks from a bottle, give a drink regularly, in small portions, preferably boiled water or fruit juices diluted with water (pure juices contain too much sugar).
  • The room should not be too hot (optimum temperature is 20 - 22°C or 68 - 71.5°F) and not too dry. If you do not have a special humidifier, hang a wet towel on the radiator. 
When to call a doctor?
You are advised to call a doctor whenever baby’s temperature is higher than 38°C or 100.4°F, and toddler’s or older child’s - above 39 º C or 102.2°F. 
The indications for immediate medical calls are also:
  • desperate cry baby, especially when touching and cuddling
  • trouble breathing
  • stiff neck, and the resistance when trying to attract the head to the chest
  • red spots on the skin
  • febrile seizures
  • diarrhea or vomiting
  • weakness, drowsiness or strong agitation
  • disorders of consciousness (e.g. hallucinations, hallucinations, anxiety)
  • dehydration - a child cries without tears, urine is dark yellow the color, eye sockets are sunken, the mouth does not have saliva.

Wednesday, February 13, 2013

Communicate with Your Child - Talking Tips

"Balloon" by Basia P., 2010
A fundamental element of discipline is to find a way how to communicate with your child in order to teach the child to talk to the others. Here are some talking tips:
  • Before giving your child a direction, in order to catch her/his attention, bend to your child's eye level and make an eye-to-eye contact. Train your child how to focus, e.g. "Barbara, 1, 2, 3 eyes on me. I need your ears for the cheers." Offer the same body language when listening to the child. Be sure not to make the eye contact too extreme that your child identifies it as controlling rather than connecting.
  • Use short sentences. You need to learn listen too. The easy way is to listen and take the notes of children’s conversation. When you observe in your child the impartial look it means that your child does no longer understands you.
  • Put the main instruction in the opening sentence. Prolong talking is a common mistake. The longer you talk, the more likely your child is loosing an interest. It gives the child the feeling that you're not sure what you want to say.
  • Ask your child to repeat the request back. If the child is not able to do it, it means that it is ether too long or too complicated.
  • Use your child's name to personalize your request, e.g. "Barbara, will you please..."
  • Make an offer the child can't reject and reason it, e.g. "Barbara, get dressed so you can go outside and play." This gives her a reason to move out of her power position and do what you want her to do.
  • Try to make a positive remark rather then negative, e.g. instead of "No running," say: "Inside we walk, outside we can run."
  • Use “I want…” at the beginning of your instruction. It will give your child a reason for compliance rather than just an order, e.g. say "I want …you to get down" instead of "Get down." or "I want you to let Anna have a turn now." instead of "Let Anna have a turn." This works well with children who want to please but don't like being ordered.
  • Use "When...then." construction. "When," which implies that you expect obedience, works better than "if," which suggests that the child has a choice when you don't mean to give him one, e.g. "When your homework is finished, then you can play the game.", "When you get your teeth brushed, then we'll begin bed story."
  • Follow the simple rule: “Legs first, mouth second.” Instead of saying "Turn off the TV, it's time for dinner!" walk into the room, join in with your child's interests for a few minutes, and during a commercial break, have your child turn off the TV, and express to your child that you're serious about your request; otherwise children interpret this as a mere preference.
  • Offer choices, e.g. when your daughter needs to have snicker for PE that day ask "Do you want white or pink snickers to school? Or when it is time to bed say “You prefer to put your pajamas on or brush your teeth first?"
  • Speak on a child developmental level, meaning consider your child's level of understanding. For instance, a common error parents make is asking a three-year- old, e.g. instead of "Why did you do that?" say "Let's talk about what you did." The younger the child, the shorter and simpler your directives should be.
  • Speak to your children socially correctly, meaning the way you want them to speak to you. Anticipate your child to be polite. Even a two-year-old can learn "please." Children shouldn't feel manners are optional.
  • Speak psychologically correctly. Threats and judgmental statements are likely to put the child on the defensive. "You" messages make a child feel accused, "I" messages are non-accusing, e.g. instead "You'd better do this...," "You must...," "You need to clear the table," say "I would like....," "I am so pleased when you...," "I need you to clear the table." Don't ask a leading question when a negative answer is not an option. "Will you please pick up your coat?" Just say, "Pick up your coat, please."
  • Reminders can change into nagging so easily, especially for preteens who feel being told things puts them in the slave category. You can communicate anything you need to say without saying a word. Write a humorous note for your child, sit back and watch it happen.
  • When your child shouts instead of talking, let him/her do it for a second. The louder your child yells, the softer you respond. Let your child to calm down while you interpose timely comments, "I understand…" or "Can I help?" Sometimes just having a caring listener available will wind down the tantrum. If you come in at his level, you have two tantrums to deal with. Be the adult for her/him.
  • Before giving your directive, restore emotional balance, otherwise you are wasting your time. Nothing is absorbed when a child is an emotional wreck.
  • Repeat your message if you feel it is necessary. Children under two have difficulty internalizing your directives. Most three-year-olds begin to internalize directives so that what you ask begins to sink in. Do less and less repeating with the age of your child. Preteens regard repetition as irritating.
  • Let your child complete the thought, e.g. instead of "Don't leave your mess on the table." say "Barbara, think of where you want to store your art staff." Letting the child solve a problem independently is more likely to create a lasting lesson.
  • Try to create rhyme rules, e.g. “If you throw you must go.”, "If you hit, you must sit." And get your child to repeat them.
  • Give your child likable alternatives, e.g. “You can't go by yourself to the park; but you can play in the neighbor's yard.”
  • Give your child an advance notice, e.g. "We are leaving soon. 5 more minutes to play… 4 minutes... Time to clean up….  Say good-bye to your friend…"
  • To open up an uncertain, shy child carefully choose phrases and stick to the topic that you know the child gets excited about. Ask questions which require more than Yes or No answer. Specify your question, e.g. instead of "Did you have a good day at school today?" say "What is the most fun thing you did today?"
  • Use "When you…I feel…because…”, e.g. “When you hide in the store I feel worried because you might get lost.”
  • Close a discussion if it is necessary, e.g. "I'm not changing my mind about this. Sorry." You'll save wear and tear on both you and your child. Control tone of your voice not to sound to bossy.

Tuesday, February 12, 2013

Effective Discipline Tips and Techniques

Parenting Styles
Since there are two type of parenting styles and outcomes there are two or more right ways to discipline and raise your children.
  1. Authoritarian parents - overly strict and bossy, believing in 'absolute obedience to authority' and creating children that are afraid of them and fearful of new challenges and experiences.
  2. Permissive parents - overly lenient, without setting any limits and creating children who are spoiled and disrespectful and unable to make their own choices. These are more likely to run into trouble with their children's future behavior.
An authoritative style of parenting is more likely to be successful in the long run. Parents who are authoritative set rules and limits, but explain why they are necessary and take their children's point of view into account when making the rules. They communicate regularly with their children and encourage them to be independent.
Another way of thinking about the different parenting styles is that authoritarian parents are overly controlling, permissive parents have little control over their children and authoritative parents have just the right amount of
control.
Discipline Guide
Learning how to effectively discipline your child is an important skill that all parents need to learn.

Discipline is not a punishment. Discipline is more about teaching your child what’s right and what’s wrong, how to respect the rights of others, which behaviors are acceptable and which are not, with a goal of helping to develop a child who feels secure and loved, is self-confident, self-disciplined and knows how to control his impulses, and who does not get overly frustrated with the normal stresses of everyday life.

If you are having difficulty disciplining your child, it is important to remember that you may not be doing anything wrong. All children are different and have different temperaments and developmental levels and a style of discipline that may work with other children may not work with yours.
You should understand that how you behave when disciplining your child will help to determine how your child is going to behave or misbehave in the future. If you give in after your child repeatedly argues, becomes violent or has a temper tantrum, then the child will learn to repeat this behavior because she/he knows you may eventually give in (even if it is only once in a while that you do give in). If you are firm and consistent then the child will learn that it doesn't pay to fight doing what she/he is eventually going to have to do anyway. Some children, however, will feel like they won if they put off doing something that they didn't want to do for even a few minutes.
Be consistent in your methods of discipline and how you punish your child. This applies to all caregivers. It is normal for children to test their limits, and if you are inconsistent in what these limits are, then you will be encouraging more misbehavior.
Vital Reminders about Discipline
  1. Stay calm and do not get carried away when your child misbehaves. Avoid yelling and screaming, since this can teach your child that it is all right to lose control if you don't get your way. If you feel like things are escalating too much, then take a break until you can regain your composure.
  2. Avoid too much criticism. Make sure your child understands that it is the misbehavior that you are unhappy with and that you will always love him.
  3. Avoid too much praise. You don't need to be continuously praising your child, especially for routine activities, because it will make your comments less effective.
  4. Don't focus on negatives all of the time, especially when offering positive reinforcement. It is much better to say ‘I like that you put all of your clothes away,' instead of saying ‘I like that, for once, you finally got around to putting your clothes away without my asking.'
  5. Avoid physical punishment. Spanking has never been shown to be more effective than other forms of punishment and will make your child more aggressive and angry.
  6. Remember to give rewards and praise for good behavior.
  7. Understand the difference between rewards and bribes. A reward is something your child receives after he has done something, while a bribe is given beforehand, to try and motivate your child to do what you want. Bribes should be avoided.
  8. Be a good role model.
  9. Most importantly, provide your child with a safe environment in which he feels secure and loved.
Effective Discipline Tips
The following are some general tips to help you effectively discipline your kids:
  1. Be consistent in your methods of discipline and how you punish your child. Your child should learn to understand that there are predictable consequences for her/his actions.
  2. Think ahead. Be prepared for what you are going to do and say to help your child understand the consequences of his actions. Don't just wing it, or do or say the first thing that pops into your head. You are more likely to react negatively if you haven't thought out your plan for discipline beforehand.
  3. Set up a daily routine for your younger children and try and stick to it each day. This should include mealtimes, snacks, bath and bedtime.
  4. Provide a safe environment that encourages exploration, but protects your child. For example, you can prevent your toddler from getting in trouble for opening drawers and cabinets if you have safety locks preventing them from opening.
  5. Set limits that are appropriate for your child's age and developmental level. Remember that you are in charge and that you will have to say ‘no' to your child sometimes. You should expect your child to cry when he does not get her/his way. This is a normal way of dealing with frustration in younger children and should be ignored. You should also ignore temper tantrums.
  6. Do not offer choices in situations where you child has to cooperate with your rules. For example, instead of saying “Do you want to take a bath?” you should instead say “It is time for your bath.”
  7. Don't give in to your child when she/he is whining, crying or having a temper tantrum. If you do, it will only teach her/him that this kind of behavior is an appropriate way to get what he wants.
  8. Learn to ignore minor, harmless or unimportant misbehaviors, such as fidgeting.
  9. Make punishments and rewards immediate. Avoid waiting more than a few minutes to provide the consequences of a behavior.
  10. Avoid repeating commands. You should give a command and if not followed, then you can repeat it once with a warning of what the consequences for noncompliance will be. If not followed, then apply the consequences. Do not continue to repeat the command.
  11. Don't argue with your child about the punishment. Ignore any protests. You can talk about it later.
  12. Plan ahead. If you always have difficulty in certain situations, such as shopping or having visitors, go over a plan of action beforehand. Talk about what your expectations are and what the consequences of misbehavior will be.
  13. Be flexible, especially with older children and adolescents. Listen and get your child's input on some rules and punishment.
  14. Use I - messages, instead of you – messages, e.g. say “I am upset that you didn't clean up your room.” instead of “You made me upset for not cleaning up.” You - statements can seem more accusatory and can lead to arguing.
  15. After disciplining your child, briefly explain the rule and what your expectations are when she/he misbehaves and explain what the proper behavior would have been. 
Discipline Techniques
The following discipline techniques can help you effectively discipline your kids:
  1. Use distraction to get your child's attention away from inappropriate behaviors.
  2. Stop inappropriate behaviors with a firm “No” while looking your child in the eyes.
  3. Physically move your child when she/he is misbehaving, especially if the child didn't respond to your firm “No.”
  4. Use extinction to remove attention from undesirable actions. As long as your child can't hurt her/himself, you can walk away and not give her/him attention or an audience for acting inappropriately, especially if she/he is having a temper tantrum. Giving too much attention to your child when she/he misbehaves can reinforce bad behaviors.
  5. Use natural consequences (rewards) to let your child learn the results or consequences of her/his actions. For example, if she/he throws a toy out the window, then she/he can't play with it anymore.
  6. Use logical consequences (rewards), for example, if a child doesn't put away a bike, then you will do it, but she/he won't be able to ride it for the rest of the day. For older children, not filling the car with gas can have the consequence of not getting to use the car this week, etc.
  7. Use time-out to remove positive reinforcement or attention when a child misbehaves.
Withholding privileges is a very effective discipline technique, especially for older children. Find things that your child likes or especially enjoys (playing video games, renting movies, going to the mall, talking on the phone), and then take it away as a consequence for misbehaving.
Encouraging Good Behavior
The first step to better discipline is to learn to encourage good behavior in your child. It is much easier to reinforce good behavior than to have to try and change bad behaviors. Here are some tips for encouraging better behavior:
  1. Reinforce good behavior by offering praise when a child does well and learn to pay positive attention to your child. Children seek approval for the things that they do, especially from their parents. Let your child know if she/he is following the rules or has done something, or made an effort to do something that you wanted. Give your child a hug, kiss or smile if she/he has been sitting quietly, completes a chore without problems, or is playing cooperatively. Also give verbal signs of approval, such as “Great cleaning!” or “I like when you sheared your snack with Samantha.” and expressed your concerns. Make sure to comment on specific behaviors or actions.
  2. Give your child choices. This allows your child some feeling of independence. For example, offer a choice between setting the table or taking out the trash.
  3. Make good behavior fun. Your child is more likely to comply if she/he is enjoying her/himself. For example, say “Let's see who can pick up the most toys.”
  4. Establish a reward system to promote good behavior. 
Time-Out
Time-out is a very effective discipline technique and will work with children as young as 18-24 months old. By using this method of discipline you are giving your child time-out from positive reinforcement (which includes any parental reaction such as yelling or hitting) after she/he misbehaves.
  1. Prepare a time-out chair, which can be a chair in any room of the house, a space on the floor, the child's bed, etc… or any place where the child is isolated from interaction with others.
  2. Use a kitchen timer to count down your child's punishment time, which is usually one minute per year of age.
Unlike the way it is used for older kids, time-out for toddlers is more so that you can give your child time to regroup and calm down. A toddler will likely not sit still in a time-out chair, even for a minute or two, and you shouldn't try to force your child to or wait for time-out to start until she/he has been quite.

When you want your child to follow a command, ask in a firm, but pleasant voice. Give your child about five seconds to do what you have asked, and if the child does not, then make direct eye contact with her/him and say "If you do not do what I asked, then you are going to sit in time-out" (and point to time-out chair). After this warning, if the child still does not do what you have asked, then say something like "You have not done what I asked, so you have to go to your time-out chair." Give these commands in a louder and firmer voice to get your child's attention, but do not yell or get angry.

Now calmly take the child to a time-out chair, ignoring any protests or promises she/he may make, and say "You stay in your time-out chair until I tell you to get up." The child must now stay in time-out until she/he has been quiet for the punishment time you have set for her/him (usually one minute per year of age). Remember that, for older kids who are being defiant, time-out does not begin until your child has been quiet, even if takes several minutes or an hour. That doesn't apply to younger toddlers and preschool age children though.

After an older child completes time-out, then she/he should do what you had told to do or if she/he doesn’t agree to do what you asked to do, the child should go into time-out again. Again - doesn’t usually apply to toddlers or younger preschool age kids.

If your child leaves the time-out chair, put her/him back in the chair and use warning "If you get out of the chair again, I am going to remove… (a desired activity/possession, etc.)." If the child gets up again, just put her/him back in the chair without warning again and apply the discipline technique. If the child continues to get out of the chair, you can consider sending her/him to a room for the time-out period (remove all toys, TV, video games, etc…).
You should probably only pick one or two forms of misbehavior that you will discipline with time-out when you first start to use this method.

Remember that this is just one method of using time-out and you will likely have to modify it to fit your own parenting style and your child's temperament. If it isn't working for you, especially if you are using time-out several times a day, or your child doesn't quickly go to time-out, then you should likely look for a different discipline technique or a different way of using time-out. Remember, it is better to support and encourage good behavior instead of trying to eliminate bad behaviors.

Time-out can also be used outside of the home, such as in stores, restaurants, etc. If your child often misbehaves in a certain setting, such as the grocery store, you should stop before entering the store and go over the rules that you expect your child to follow. Also, give a warning about what will happen if she/he misbehaves inside the store. If the child does break one of the rules inside the store, you should now place her/him in time-out.
Temper Tantrums
Temper tantrums are a way for your child to express feelings of anger or frustration. While they are a normal part of the development of toddlers, they should be occurring less frequently after the second birthday. They usually increase when children are hungry, tired or ill and you should try to help them cope with these situations.

You should try to ignore attention-seeking or demanding tantrums and avoid situations that you know will lead to a tantrum (including changes in their regular daily schedule). If you can see that your child is getting overly frustrated and that a tantrum is coming, you can try to distract the child and shift the attention to something else.

Help your child to realize that temper tantrums don't work, that they are not going to help them get out of doing things that they need to do. For tantrums that are disruptive, you should give your child a time-out. Remember to praise your child when she/he controls her/his temper and cooperates with what you want your child to do and set a good example for your child by remaining calm and not getting out of control.
How to stop biting?
Biting adults or other children is a common behavior in most toddlers and increases when a child is tired or frustrated. It is important to not overreact when it occurs; instead treatment consists of teaching your child that it is not acceptable behavior.

Some steps to take when your child bites include:
  1. Immediately look your child in the eye and give a firm “NO.” You may also move your child to another area for a time-out. Let your child know that it is never all right to bite another person because it hurts.
  2. Supervise your child closely when she/he is with other children, so that you can distract your child or interrupt any behavior that may lead to biting.
  3. It is important to not overreact and never bite your child back. Biting your child back or physical punishment will just reinforce that it is okay to hurt others.
  4. Give your child lots of praise when she/he controls biting.